Showing posts with label Fantasy. Show all posts

More Fun With Nightwatch: The Corrupted Garrison

Having really enjoyed my first adventure using the Nightwatch rules, the only thing for it was to keep experimenting. How easy would it be to adapt Nightwatch to exploring a dungeon environment? Only one way to find out: send more hobbits into peril!

The main challenge would be adjusting the movement rules given the relatively cramped interior spaces involved. Per the book, the default movement rate in Nightwatch is seven inches (a six inch front-to-back or "leap frog" move) that is halved for difficult terrain. In my estimation, this would be way too generous for indoor adventuring. The solution was pretty obvious, based on my experience with "crawler" board games and our own "Dungeons Deep & Caverns Old" miniatures game: zone movement. So once I had the basic layout of the dungeon set up, I just needed to carve it up into zones.

I'll reference this map throughout the report below but for now suffice it to say that our adventurous Halflings would spend their first free move to enter via E1 into zone 1-A. Green rectangles represent open passages while red ones designate passages that are permanently or temporarily blocked.

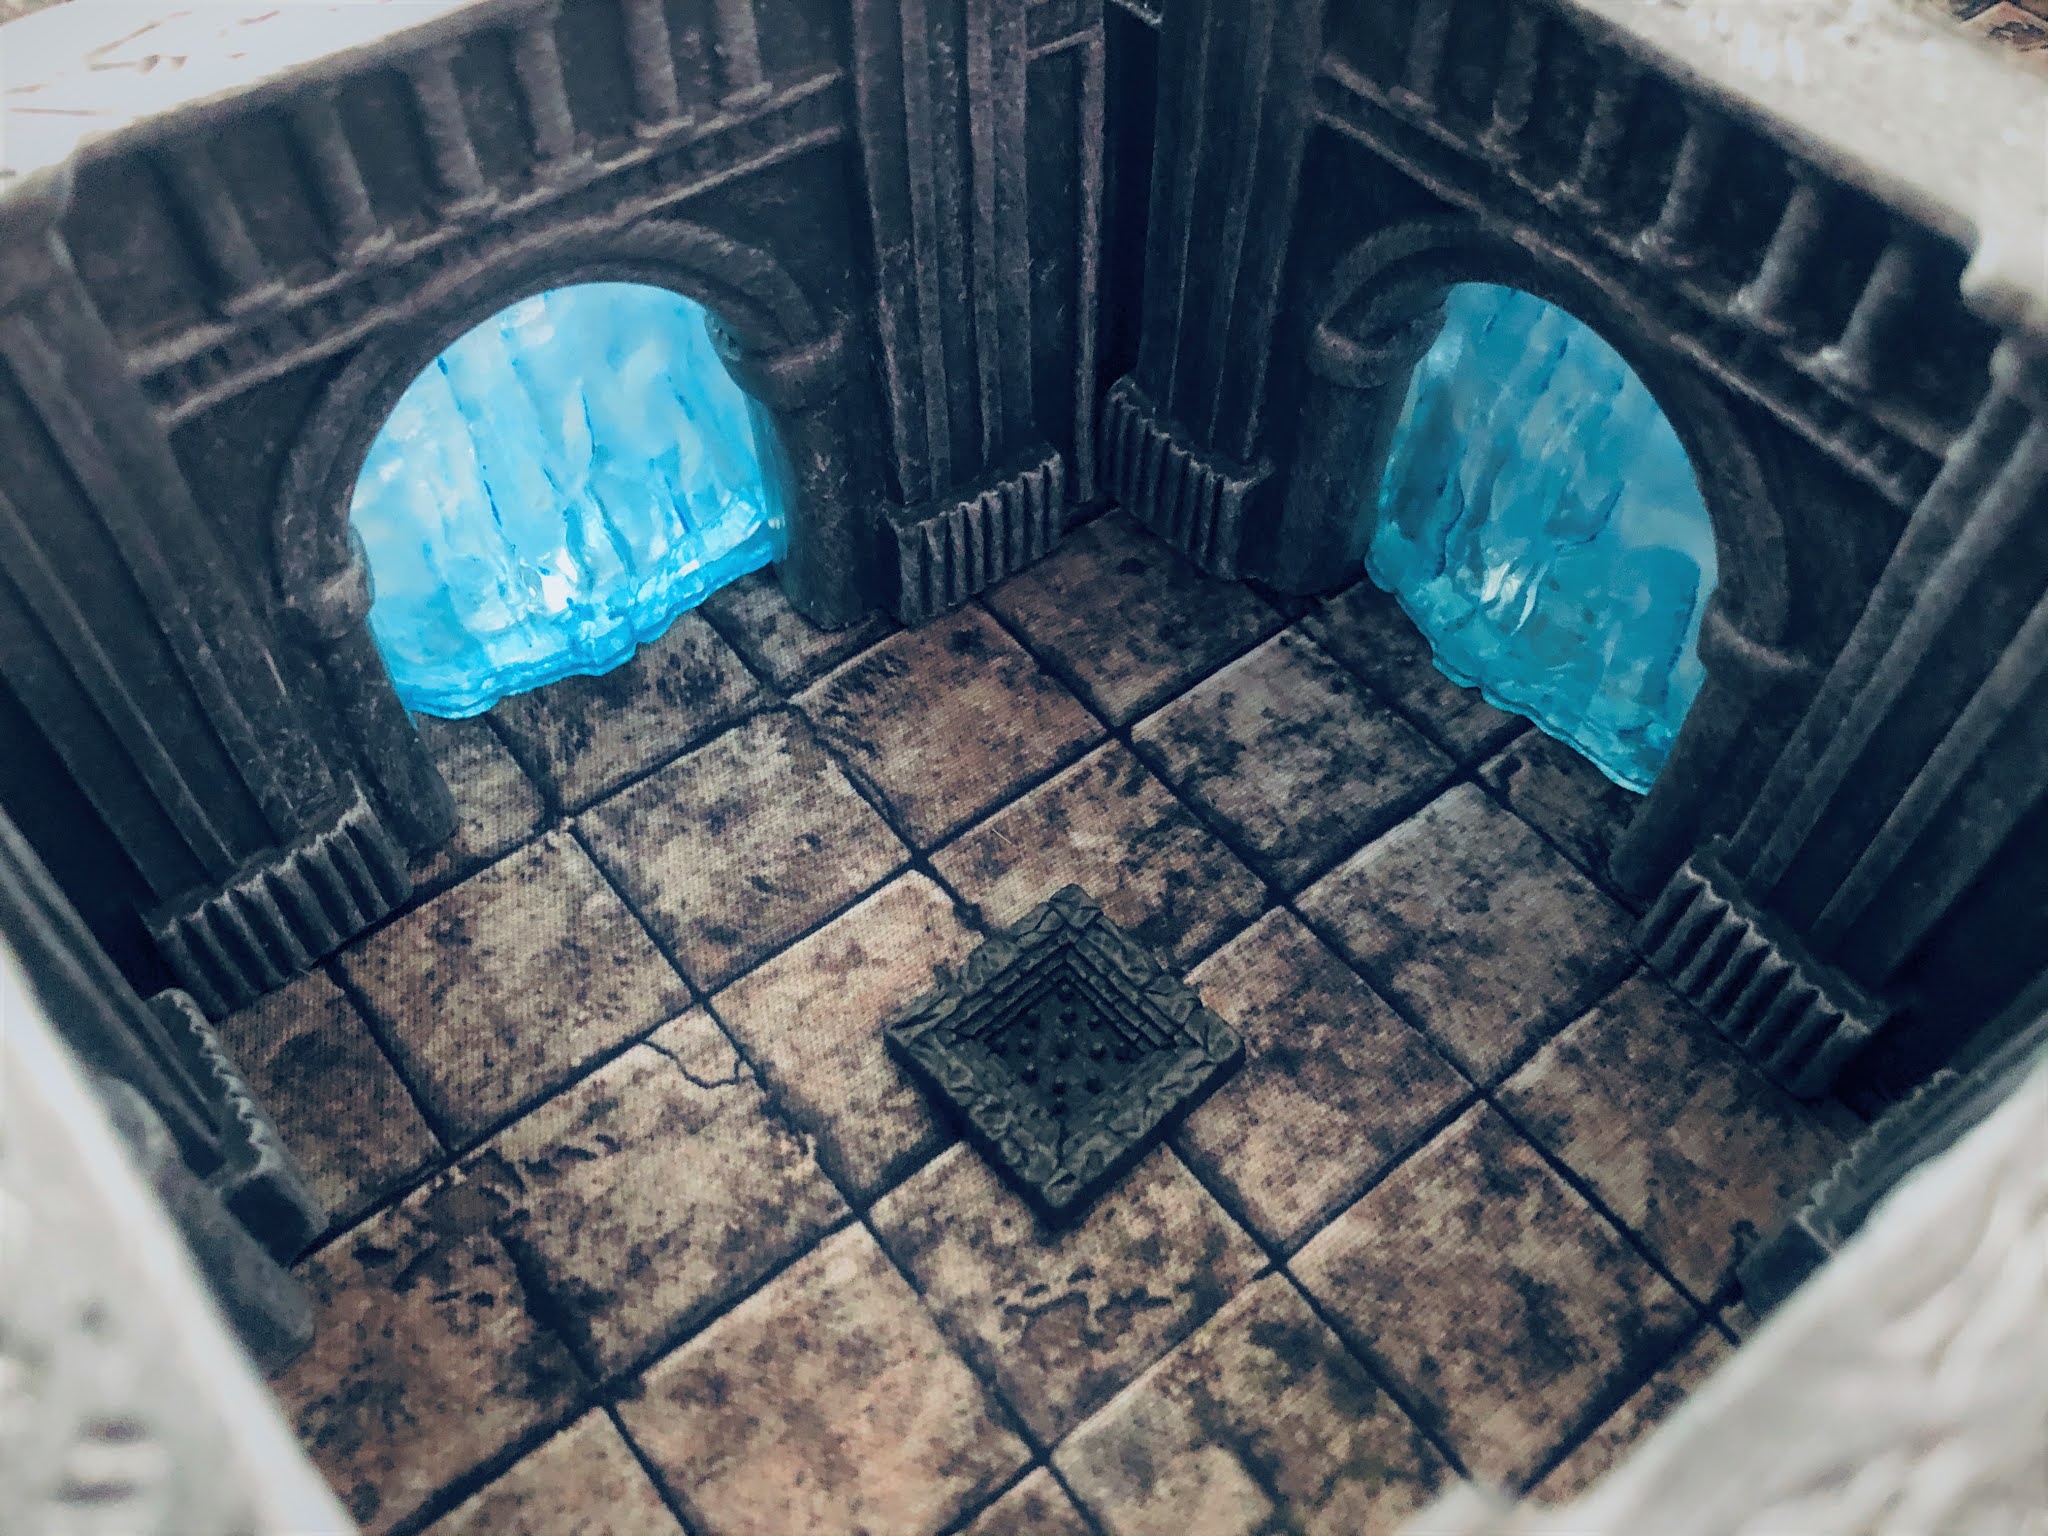
The next challenge was handling indoor ranged attacks. I constructed this dungeon using pre-painted terrain available from Urbanmatz; more precisely, their Gothic Walls. This set has pieces with open passages as well as semi-obstructed ones per the photo below.

I decided that neither PCs nor Monsters could move through these passages but could shoot through them at a -2 penalty. Several Skeletons armed with bows started in-play, in rooms where they could be shot or from which they could shoot out but not be reached for melee combat.

The next issue was figuring out how tough to make the Skeletons. I started out by using the Vermin rules (free move + 1d6 activation dice pool) but found that made the bonemen too chumpy. So I settled on giving them a 2d8 dicepool and allowed them to spend 1d8 for a free move. The result was them being pretty dangerous but also kind of slow, which felt right for the dungeoneering experience.

Room 2

The Halflings started by exploring Room 2, the barracks. To get to the investigation point in zone 2-C, they would have to navigate either or both of zones 2-A and/or 2-B. As you can see on the map above, I have those zones marked with a special border, indicating that they are dangerous terrain. In the picture above, you can see that there are traps on the floor.

Mechanically, this is represented by the PCs needing to use an action to make a check to avoid the traps when moving into (but not out of) the zones. The PCs need not make this check, but if they don't (or if they did and failed), they would take a wound. This further slowed down the pace of exploration and lent the small space a somewhat "larger" (cinematically speaking) sense.

Having made it past the traps, the Halflings found a tattered journal in a chest next to the bunks indicating that the nearby Chapel-Infirmary (Room 5) had been desecrated and the corpses of former guards turned into necromantic batteries powering magical barriers preventing exploration deeper into the dungeon.

Room 3

Two of the three magical barriers were blocking the north and east passages of the central intersection at Room 3, which as you can see from the map and the photo above was also trapped. The Halflings had little reason to back to Room 2 but nevertheless the trap in Room 3 would make navigating the dungeon difficult throughout the entire session.

In a small pouch tucked away with the journal, the Halflings found a charm that, according to the anonymous author, could be used to purify one of the defiled corpses and thereby dissolve the associated barrier. But navigating the Chapel-Infirmary, would be precarious because it was likewise full of traps. This time, poison gas! Fortunately, the journal also explained that an antidote for the poison could be found hidden away somewhere in the cluttered stores (Room 4).

Room 4

Even despite Room 4 being one of the smaller physical spaces in the dungeon, I decided to carve it into three zones to simulate the difficulty of navigating all the junk. (Note that D3 is permanently blocked by cumbersome supplies.) I had a mechanic kinda-sorta in mind for how the Halflings could try to find the poison antidote among the crates and barrels and chests but I did not end up using it because, well, let's just continue the story for now. On to the Chapel-Infirmary.

Room 5

Room 5, like Room 4, is carved up into quite a lot of zones. I designed this area for a lot of player interaction and wanted to make sure that it was plenty dangerous but not overly lethal. Instead of taking a wound for failing the check to move carefully (or just failing to even attempt to move carefully), the unlucky (or incautious) PC would take a poison token that would inflict a -1 penalty on any roll of their largest remaining die in their dice pool.

So, for example, a PC who had already taken a single wound also took a poison token, they would roll their d8 at -1. If they took an additional poison token, they would roll both their d8 and d6 at -1. Worst of all, a third poison token at this point would eliminate their free move! This ended up being pretty tense and, well, let's just say I probably should have spent some time searching for the antidote.

I should also note that all this time, during the Darkness phase, a single Skeleton had a 5 in 6 chance of entering the dungeon at E2. So in addition to all of these traps, the Halflings were also constantly fighting the undead (who I decided could not be harmed by the traps). But at this point, things were still looking pretty good.

In order to lower one of the magic barriers, the Halfling equipped with the charm would need to perform an interact action at one of the three investigation points in zones 5-B, 5-C, or 5-D. I decided that it didn't matter which one at this point: upon a successful interact action, the barrier blocking D1 would dissolve. The issue was, which barrier would be dissolved the second time the Halflings tried the ritual? I decided to randomize it between D2 and E4.

Also, at this point, Skeletons were now appearing at either E2 or E3. Rooms 8 and 9 were of course still blocked off by D2. The idea there was, if the PCs dissolved the barrier blocking D2, a whole slew of bonemen could march out at them together ... or not, depending on how the dice rolled when it came to randomly assigning new Skeletons every Darkness phase. As it turned out, quite a few of them started to build up at 8-A:

Room 8

But that wasn't a problem just yet. Dissolving the barrier blocking D1 opened up Rooms 6 and 7. The first was just a hallway with another magical barrier blocking E4. But Room 7 was the Officer's Quarters, where the Halflings could find another charm to purge one of the remaining two necromantic barriers in the Chapel-Infirmary. No matter which investigation point they chose, however, the outcome was a fifty-fifty chance between D2 and E4.

Room 7
As it turned out, the Halflings dissolved the barrier blocking E4 and behind it stood the Terror! I somewhat foolishly did not adjust the Terror's rules so it had a free move plus its usual 3d10 dice pool. At this point, I decided if the Halflings could defeat the Terror they would "win." They were in fairly good condition, with just a poison token each. So they bravely, or foolhardily, rushed to meet it; and it did likewise.

The Final Confrontation
Unlike normal Terrors per the rules, I also decided that this one, the Terror of this particular dungeon, would have three rather than one wound. The Halflings fought bravely but, worn down by constant combat with the roving bonemen and the poison gas, they could not land the final blow before meeting their own fates.

Alas!
It's worth noting that had the barrier blocking D2 been dissolved it would not only have unleashed the Skeletons waiting at zone 8-A but also opened up the final room, the Commissary.

Room 9
The Commissary is pretty spacious but I left it as one zone. The idea was that in order to move into base to base for melee combat, Skeletons and PCs starting their turn inside of Room 9 would still have to make a move action. But they could enter the room directly in melee range with an enemy already in that room. The other idea was that the PCs could make a search action in the Commissary at any time to obtain a Health Potion. This ended up being sorely needed in the final analysis, but of course Room 9 was never accessible.


I didn't spend a lot of time spinning a tight story about why the Halflings were exploring this dungeon, what had happened there, or exactly how the whole thing should work. The point was to quickly get something put together to just keep playing around with the Nightwatch rules. In conclusion, Nightwatch again proves that it is flexible enough to be used for fantasy adventuring beyond the theme laid out in the book without much pre-planning. This whole dungeon fit snugly onto a 2x2 mat but one could easily imagine a much more extensive structure with all kinds of more complicated and dangerous encounters.


Fantasy Adventure with Todoroff's Nightwatch

Ostensibly, Nightwatch is a game about seasoned monster hunters sworn to chase down and ultimately rid the world of some terrible evil. And between these grim hunters and their quarry are wave upon wave of relentless minions. Cool, but not necessarily what I'm looking for in a miniatures game. Rather, I want a miniatures game that emulates the feel of classic D&D adventuring without a dedicated DM player. Nightwatch seemed promising, in that it's a solo/co-op game where the players control a small group of adventurers defined by their classes.

But I had one major concern: designer Patrick Todoroff writes, "you'll need need several dozen monster types of various kinds." First off, I just don't want to have to buy, assemble, and paint up that many miniatures for what, for my purposes, should be an "ultra skirmish" game (i.e., very low figure count). But more importantly, squaring off against dozens of monsters just doesn't feel like D&D to me. YMMV. So could I get the results I wanted from Nightwatch without the "several dozen" enemy miniatures? I set out to find out armed with a paltry nine plastic Skeleton figures from Wargames Atlantic. Against them stood four brave plastic Halfling figures, made by the same company.

The other concern was more broad: Is Nightwatch flexible enough to handle my particular vision of D&D? This boils down to an approach where "calls" matter more than rules. That is, where the game supplies tools to support adjudicating whatever crazy things might come up during the course of play rather than forcing play into predetermined categories of interactions. Would my brave Halflings be able to do anything beyond move, ranged attack, melee attack, rinse, repeat? What if they wanted to try to swim in a river, for example? Again, Nightwatch seemed promising because Todoroff clarifies straightaway that "Nightwatch is a toolbox, not an extensive, pre-packaged, comprehensive system."

OK so challenge accepted! Where to begin? If it was a "theatre of the mind RPG," I'd need a story hook. But for a miniatures game, at least in my approach, story begins with terrain. And this seemed like a wonderful excuse to dig deep into my collection of ready-to-play terrain items from Gale Force 9, Wizkids, and Monster Fight Club. So, prior to game night, I fiddled around with a couple of 2x2-foot neoprene mats from Battle Systems and a wealth of scenery.

A Perilous Quest

A story began to emerge as I tinkered away. Wishing to seize control of a strategic bridge, a necromancer attacked the surrounding community and devised a typically macabre means of garrisoning the ruins: by way of corrupting energies, symbolized by fell crystals growing out of toxic pools, sorcerous standing stones erected nearby in the forest would continuously reanimate undead warriors to hold the bridge. Consulting an erudite scholar of magic, our heroes learn that shards of these crystals must be sheared off and used at the standing stones in a ritual to exorcise their horrid power, thus liberating the bridge.

In game terms, the objectives were to (a) get to the green stars (the crystals) and use an Interact action to collect a shard from each and then (b) carry the shards to the blue stars (the standing stones) and perform the ritual with another successful Interact action. Skeletons would be defending the ruins of the town and any that were slain in the process of exploring the ruins would be redeployed at one of the two standing stones, returning to further harry our heroes. The Halflings started at the red circle at the river ford.

Here is what the Halflings ended up facing on game night, on the ruined town side of the play area:

Oh man look at those bonemen go!

Note that there are "investigate tokens" placed on various elements of scatter terrain, indicating that these are searchable. In base contact with the crates and barrels, a player character ("PC" - I'm using the standard RPG term rather than Todoroff's theme-specific term "Hunter") could make an Interact action to search them for useful common items: roll 1d10 and on a 1-9 it would be one of the common single-use scrolls, potions, or "grenadoes" a character can start the session with and on a 10 it would be a single-use Token, a kind of magical curio. Common items take up a "belt slot" of which a PC only has two, whereas Tokens do not take up a belt slot.

Also of importance: to get to a crystal for the purpose of breaking off a shard, the PCs would have to wade through toxic sludge. In addition to being difficult terrain (halving movement), any character who ended their turn in the sludge gained a Poison Counter. Three of these translated into a Wound, of which PCs only have four. And for each wound taken, a PC loses one of three potential activations during his turn.

Meanwhile, here is the comparatively desolate forest portion of the play area, where the necromancers vile servants erected the magical standing stones:

Spooky Times Ahead

We randomly determined that the river flowed slowly from the town side toward the forest side. Apart from the ford, it counted as difficult terrain plus any figure that failed a movement check when attempting to cross it would be carried two inches down river. None of this is from Todoroff's rulebook; it's just the sort of "D&Desque" call that I like to flavor a scenario. It would become pretty important later on ...

Reolus the Ranger Found 1SP.

Getting into the action of our session requires a little bit of description of Nightwatch's mechanics. All PCs have a dice pool consisting of 1d6, 1d8, and 1d10. Any action, apart from a free move, requires selecting one of these dice and rolling a 4+, which is obviously easier on a d10 than a d6. So if you want to move in addition to your free move, you need to roll one a 4+ on one of the PC's dice. If you don't, that PC doesn't move. If you want to hit an enemy in melee combat, you need to roll a 4+ on one of the PC's dice. If you don't, that PC's attack fails to hit. And so forth. If it's something you really need to work, use a die with more faces.

Once you roll a die, it is spent for this turn regardless of whether you roll 4+ on it or not. And when a PC has no more dice to roll, their turn is over. So each unwounded PC ends up with a free move and potentially three more actions per turn. Of course, if you roll really poorly you might only get the free move, but in my view something is better than nothing. The entire dice pool is ready to use again on the next player phase, called the Pact Phase.

Noble Scudamor Surrounded!

But before the PCs go again, the monsters get to act in the Darkness Phase. The most basic monsters are called Vermin and they have a free move just like the player characters but they only have a single d6 for their dice pool. I decided the Skeletons would be represented by the next most powerful category of monsters: Horde figures with a free move and a 2d8 dice pool. Just like PCs, monsters need to roll 4+ on dice to attack successfully or do anything else. If they successfully hit a PC, or if a PC successfully hits them, they get to make a Dodge/Defense (DD) save: roll a 4+ and you don't take a wound.

Almost all monsters in Nightwatch are vanquished upon taking a single wound. They roll their DD check on their usual die type (d6 for Vermin, d8 for Horde, etc.). PC's check DD on a d6 but the result can be modified by the type of armor they are wearing. Heavier armor can give you a +1 to your DD check but also cost you 1" of movement, and vice versa for lighter armor. When the attacker outnumbers the target, as in the picture above, the target tests DD at -1 for each opponent beyond the first. So PCs definitely do NOT want to get swarmed!

As mentioned above, PCs only have four wounds. But the bigger problem is a PC loses a die from his pool for every wound he has taken, starting with the d10, then the d8, and finally the d6, until a PC who has taken three wounds only has his free move left. Mercifully, you can spend your free move to Imbibe a potion in your possession ... like a, um, Health Potion.

What's in the boxxxx?

Having retrieved two of three crystals shards necessary to perform the ritual, our Halfling Heroes were making good progress into the ruined town. They suffered a few wounds which they shrugged off by way of imbibing Healing Potions they had wisely brought along, freeing up belt slots. So should they hurry on to the final toxic pool or search the ruins for other helpful items to fill those empty slots? After defeating this Skeleton spearman, plucky Priamus tried his luck and found a Smoke Grenade.

They went thattaway!

On the other side of the King's Road, reanimated Skeleton warriors so lately despatched by our intrepid Halflings returned from the dreaded forest to exterminate the intruders. The Skeletons had little enough trouble, with their free moves and 2d8 action dice pool, finding their way back to the action. So far, I did not feel like I really needed dozens of monster figures to have a dangerous adventure with the Nightwatch rules. These nine Skeletons were giving the Halflings enough trouble. Correction, eight skeletons. The Ninth had yet to reveal himself in his dark glory ...

Bumbling Bonebois

Priamus used his recently-looted Smoke Grenade to confuse the skeletal advance. Per the published rules, a Smoke Grenade can be thrown 12 inches and will not scatter on a successful ranged attack check. Targets, whether friend or foe, caught in the resulting large blast template (failing to find a definition in the rules, we decided on 6 inches) blindly wander around until they are out of the smoke, using a d10 to randomize the direction of movement and distance traveled (result halved). Here, we made our own call: if a Skeleton stumbled into scenery, it would fall prone and have to use a free move or movement check to stand back up before moving farther.

It just made sense that barely sentient undead would be clumsy. Whether Skeletons with empty eye sockets could really be confused by vision impairing smoke is, of course, metaphysically debatable. Similarly, would Skeletons be effected by a Stun Grenade? How do they draw LOS? The point is, these are all opportunities to make calls during the course of play just as a DM would when running a session of old school D&D. Whatever you decide will probably not "break" Nightwatch because of its inherent flexibility. The system is sound enough to let the players choose whatever seems most exciting or interesting.

And boy would things get interesting soon enough!

Check out the index card "character sheets."

Eventually, the Halflings made it to the second toxic pool and found it guarded by a more capable servant of the necromancer. The next highest level of monster is called a Terror and has a free move plus a 3d10 dice pool. Our heroes decided discretion was the better part of valour and retreated from it after retrieving the shard, but the Terror easily caught up with fleeing Priamus.

Rather than face down the Terror, he jumped into the river and attempted to swim downstream. But failed his check and bumped his head on the stone bridge. He made a check to resist being knocked out ... and failed again! He made a third check to see if he started to drown (i.e., took a wound) as he bobbed unconsciously downstream. Whew, a lucky success. His heavy pack must have weighted him to float face-up.

Here again, there was nothing in Todoroff's rules to indicate whether a PC could do this much less what should happen if the attempt went poorly. We just used our best judgment and found that Nightwatch's fundamental structure easily allowed us to adjudicate the results on the fly. As to what happened to poor Priamus? On the other side of the bridge, a Skeleton fished him out of the river and he had to use dice from his pool to recover consciousness. Again, not in the rules but the rules are so open and sturdy that it was a cinch to seamlessly carry on the adventure even when faced with such unexpected circumstances.

Once Priamus so quixotically escaped the Terror's icy grasp, Adelgrim the Ranger (just barely seen in the top right corner of the picture above) decided to sing an arrow into the imposing skeletal serjant. A hit! And to the player controlling Adelgrim, an unwelcome surprise. He did not know that the Terror, like Horde figures, only had one wound. And where did the fiend reanimate?

SH-T!

Right at the sorcerous standing stone where Reolus and Scudamor had hurried off to commence the ritual of exorcism! Adelgrim, carrying the third of the three shards, soon joined them and the Terror could not stop them from completing the ritual on the first standing stone. But he summoned his silent minions to march through the claustrophobic forest and punish our heroes. Scudamor fell fighting off the undead but not before throwing the shard in his possession to Adelgrim. Reolus likewise prepared to meet his doom, passing off his shard to his fellow Ranger.

The Fall of Reolus

Surrounded (-3 to DD rolls), Reolus could not withstand the Terror and his minions, who carved up the unfortunate Ranger rather than breaking off immediately to pursue Adelgrim. Meanwhile, Priamus in soaking chainmail hastened from the river after defeating the undead warrior who had pulled him out, in a desperate attempt to reach the final standing stone. So much for the merry chase our Halfling Heroes had led the undead warriors on back in the ruins! It was now or never and at the second stone, Adelgrim was fumbling badly through the ritual as the Terror finally caught up with him.

There may come a day when the courage of Halflings fails ...

Priamus the Sodden made it, just in time to retrieve the final shard from Adelgrim and complete the exorcism! The necromantic fires of hatred where quenched in the Skeletons and they crumbled, bones and weaponry alike clattering amid the stony forest underbrush. Our heroes had liberated the bridge from the evil sorcerer's servants but at dear cost. Scudamor and Reolus likewise lay still among the fallen autumn leaves. There would be no further adventure for those brave companions. But to stand up against those who so carelessly underestimate them, a Halfling warrior would gladly pay his life's blood!

So did Nightwatch work for what I wanted? You bet it did.

Todoroff is absolutely correct to characterize Nightwatch as a toolbox. Veteran miniatures gamers might object, "What's the big deal? Any ruleset can support scenario-specific rules." The trouble is, scenario-specific rules are still rules in the sense that you have to invent them beforehand and they need to harmonize with all the other rules at play. What I wanted, and got, out of Nightwatch was a structure that allowed me to make calls rather than apply rules.

To illustrate the difference, let me point out that I could not find any rules for stealth in the book. So what can be done about it? Well, using the approach of scenario-specific rules, I would need to invent a stealth system and playtest it to see if it broke the structure of the game. I was recently brainstorming such a mechanic with a friend where a figure would be considered to have "stealth status" until it failed some kind of push-your-luck roll, which would emulate the tension of needing to be swift but wanting to remain unseen. Maybe we could implement that in Nightwatch.

But what if it just came up during the course of play and we hadn't thought of it before hand (like willfully plunging into a river). With Nightwatch, it would be so simple to make a call, based on the particular circumstances of that moment in the game, that a PC could remain undetected by monsters that hadn't already seen him simply by taking a -1 penalty to his movement check. Or maybe instead of a penalty, his movement while trying to remain undetected would simply be halved. Or rather than either of those things, he would need to make an additional role from his dice pool after making a successful movement check: you moved the full distance but it turns out it wasn't stealthy!

With Nightwatch, I could use any or all of these simple solutions in the course of the same game. Which I picked would just depend on what was going on at that instant, what made sense for that moment rather than what would make sense prospectively for all hypothetical moments. The latter is the domain of rules instead of calls. Calls are for this instance, rules are universal. This is what I mean when I say that Nightwatch, for me, captures the old school D&D feeling I want.

And I definitely did not really need dozens of monster miniatures on hand to get the experience I wanted. Now if you want to play the specific theme Todoroff presents for Nightwatch, maybe you do need that many miniatures. I did not. Just how many Skeletons did the Halfling Heroes defeat? We stopped counting at twelve. That's right, a dozen. Just by recycling Skeleton casualties back into play, we ended up fighting at least twenty one enemies using only nine miniatures to represent them. The gradation between Vermin, Horde, and Terror really helped there.

I also considered allowing the Skeletons to use the same Weapon Skills as the PCs. I didn't go into it above but fighting with a certain weapon allows a PC to perform special tricks. For example, Scudamor was armed with a single shortsword. Therefore, he could make a melee check against a Skeleton that would push the boneman back an inch rather than possibly killing it, avoiding the Skeleton's DD check and freeing him up from having to take a free attack from the Skeleton if he had disengaged from base contact. What if monsters could also use these tricks?

We tried it with the Terror, who had a hoplon and kopis, meaning that on a successful d10 melee attack check he could also make a free d6 shield bash attack check. It made him that much more frightening, although was it necessary considering his 3d10 dice pool? And whether that's too in-the-weeds for minions at large is a question for another day. It's simply another thing to try with this toolbox called Nightwatch. Another simple experiment would be to give a minion monster multiple wounds.

I have some reservations about Nightwatch, of course. For example, what would differentiate an Orc raider from a Skeleton warrior? Even old school D&D has enough granularity to make those enemies meaningfully different. Maybe not so, with Nightwatch. But that's another challenge I'm willing to accept after this excellent first impression.

For another hobbyist's take on Nightwatch, played more "as-intended," please check out this video from Dice Tales on YouTube:


[Test Driving] Conquest: The Last Argument of Kings

My friend Kevin and I pre-ordered the first wave of product for Conquest: The Last Argument of Kings, a rank'n'flank mass battles game designed by Alessio Cavatore and published by a Greek company called Para Bellum. The "core box" is a two-player starter set featuring the Hundred Kingdoms and Spires factions. The former are your standard medievalish humans and the latter are decadent space aliens, otherwise known as elves.

This past weekend, we finally had a chance to break out the core box forces and try out the rules. We settled on a 10-round match without objectives, just to ease into the mechanics. I consider this a "test drive" because we were only trying to destroy one another with no other, more complicated goals to drive strategy and tactics and because we used a very small number and variety of the units available to the factions.

In Conquest, all units are categorized as Light, Medium, and Heavy class. Armies encounter each other gradually over the course of first five turns of the game, starting with Light regiments scouting out the battlefield before the hardier ones march out. Below is a picture of Turn 3 from our test drive. I'll describe how we got to this point over the first two turns in detail, sketching out some of the fundamental mechanics of Conquest.


To deploy Light regiments on Turn 1, the players need to roll a 3+ for each. Mercenary Crossbowmen and Force-Grown Drones (hereinafter "FGDs") are the Hundred Kingdom and Spires Light regiments included in the core box, respectively.

Kevin successfully rolled to deploy his Crossbowmen (who are literally un-armed; Kevin didn't have time to finish assembling them) from his table edge while my Force-Grown Drones ("FGDs" for short) apparently decided to hang back. 

Players can start rolling to deploy their Medium regiments on Turn 2, needing a 5+. You still need to roll a 3+ to deploy Light regiments on Turn 2. The core box comes with two Medium units for the Hundred Kingdoms: Men-at-Arms and Household Knights. There is only one Medium unit in the core box for Spires, the Brute Drones.

On Turn 2, Kevin successfully rolled for his Household Knights and I did the same for my Brute Drones. The Men-at-Arms and FGDs must have still been en route. The Crossbowmen advanced forward toward a low wall dividing the battlefield and the Household Knights rode up behind them. In Conquest, you can charge through friendly regiments so long as the end position of the charging unit doesn't overlap that of the friendlies. My Brute Drones marched up behind a stony patch of bush to gain some cover from any potential crossbow fire.

Any Light regiments that have not previously been deployed automatically march on the field on Turn 3. Medium regiments pass their deployment test on 3+ on Turn 3. My surly FGDs finally arrived (far left in the picture above) and Kevin succeeded in bring on his Men-at-Arms (not pictured above, with apologies to the reader) to meet them.

A few notes at this point:

First, every unit in your army has a corresponding card which goes into your Command Stack. At the beginning of each turn, you put the cards representing each unit in the order that you want to activate them. The players take turns drawing cards from their resulting Command Stacks.

Second, characters in Conquest must enter the battlefield as part of a regiment of the same type as them. In addition to class (Light, Medium, Heavy), every unit also has a type (Infantry, Cavalry, Brute, Monster). In the core box, the Hundred Kingdoms character is a mounted Noble Lord (who has type Cavalry) and so must come onto the field with the Household Knights. The Spires character in the core box is the Pheromancer (who has type Infantry) and enters the field as part of the FGD regiment.

Characters have their own cards in the Command Stack but do their moving and fighting along with whatever regiment they have joined. When their cards are drawn from the Command Stack, they can use certain abilities (like spells) or take special character actions (such as challenging an enemy character to a duel, in certain circumstances). Many of these abilities involve changing the order of the Command Stack, so you need to take this into account when building the Command Stack at the beginning of each turn.

Third, and this is extremely important, deployment zones change as regiments march deeper into the battlefield. Heavy regiments may deploy from any edge of the battlefield behind your forward-most Medium or Heavy regiments, which has not itself been surpassed by an enemy regiment. Light and Medium regiments likewise deploy from any edge behind your forward-most Light, Medium, or Heavy regiments. This means destroying enemy regiments or even just marching past them can have the greater impact of disrupting your opponent's ability to bring reinforcements into battle from as far forward as they might otherwise deploy. It also means you have an incentive to get your forces moving up into position rather than hanging back.

With those points explained, I can get into the whys and hows of the picture of Turn 3 above.

I won the initiative roll at the top of the turn and so marched my Brute Drones up toward the Crossbowmen. I knew they would have to take some fire but wanted to get my deployment line deeper into the field for when the FGDs came on. Kevin responded by moving his Household Knights behind the Crossbowmen, no doubt hoping he would win initiative on Turn 4 and be able to charge the Brute Drones through his Crossbowmen after shooting them on this turn.

Seeing the Knights committed against the Brute Drones, I brought in the FGDs from my new deployment line behind the Brute Drones, hoping to tempt Kevin to respond by deploying his Men-at-Arms against them, which he did. I marched them onto the low stone wall mentioned above. Without going too far into the terrain rules at this point, I was hoping to tempt Kevin into charging me over the wall but we'll come back to that. In the meantime, Kevin unleashed a full volley of aimed bolts at my Brute Drones, killing one of the Brutes. I wasn't too worried with two left, just as long as I could win initiative on the next turn.

At the top of Turn 4, I succeeded on my 5+ deployment test to bring on the Abomination (type Monster, class Heavy). And, unfortunately for Kevin, I also won initiative! The two remaining Brute Drones duly smashed into the Crossbowmen and destroyed the entire unit.

Importantly, "Charge" is not an attack action. Every regiment can take two actions per activation and the only action that can be taken twice in an activation is "March." The Charge action is a move equal to the regiment's March value plus d6 inches. Charging into a regiment prevents that unit from being able to Charge that regiment. But the Charging regiment will need to have another action remaining after the Charge to attack, or "Clash." If the regiment Clashes after Charging, it makes Impact attacks on top of its normal attacks to the tune of one half (rounded down) of its normal attacks.

Every successful Impact and Clash attack triggers an injury roll by the regiment receiving the attack and any unsaved result in wounds. Then the regiment that received the attacks must make a resolve test for each unsaved wound with each unsaved resolve test causing an additional wound! This can make charges against regiments with low Resolve stats absolutely devastating, as Kevin's Crossbowmen found out! (Note: Wounds taken as a result of ranged attacks do NOT cause Resolve tests, making Conquest impervious to "gunline" army lists!)

But with the Crossbowmen wiped out, Kevin took his revenge and charged the Brute Drones with his Household Knights and Noble Lord, handily wiping them off the battlefield. Next, I deployed the Abomination up behind the portion of low wall at the very center of the battlefield, hoping that I would either tempt Kevin to once again Charge over a wall (which is even more dangerous for Cavalry type regiments) or force him to maneuver around it and miss his Charge in the case that I lost initiative at the top of Turn 5.

Kevin deployed his Men-at-Arms from his right flank edge and attempted to Charge my FGDs before they scurry back over the wall. But he rolled a 1 on his d6 and just barely missed it. Turn 4 therefore ended with the lucky FGDs backing up and putting the wall between themselves and the grim Men-at-Arms.

Kevin won initiative on Turn 5 and wheeled his Household Knights around to get into position, basically trying to prevent my abomination from Charging into their flank, which as in all rank'n'flank games is an especially effective attack. Nevertheless, I charged my Abomination into their front rank, eviscerating one of the Knights.


Perhaps regretful that he did not simply take the risky charge over the wall against the Abomination, Kevin steeled his resolve on his right flank and charged over the low wall at my FGDs. Terrain is wonderfully simple in Conquest. There are a few generic rules that can be assigned to the terrain you are using at the beginning of the game. For the wall, Kevin and I decided we would apply the Broken Ground and Hindering rules. In a nutshell, this made the walls dangerous to Charge across.

Kevin's Men-at-Arms not only lost their Impact attacks because they charged across the wall (Hindering) but also needed to make a test for every stand of figures in his regiment that charged across the wall (Broken Ground); in this case, all six stands! The Men-at-Arms took three casualties before making contact with the FGDs, a tremendously unlucky roll.


The Clashing Infantry regiments pictured above pre-casualty removal. The terrain doesn't actually appear in the picture because we had to remove it, considering the Men-at-Arms were attacking from on top of it. Note that the core box contains six stands each of Men-at-Arms and FGDs and they can be taken in regiments of three stands. But the core box only comes with one card for each, meaning you can't actually use them as separate units right out of the box. This is my only real complaint about the core box.

Back to the action:  FGDs are a really awful unit, to be honest, just considering their stat line. They are bad fighters and they are very easy to kill. Kevin's charging Men-at-Arms removed two and a half stands of six. Fortunately for them, my character the Pheromancer had joined their regiment. And the next card I drew was the Pheromancer, enabling me to heal d6 wounds on the FGD regiment and return one of their vanquished stats. Kevin then drew his Noble Lord card but had nothing to do with him. Lastly, I drew my FGD card and Clashed against the Men-at-Arms with negligible results.

At the top of Turn 5, I once again lost initiative and made a big mistake. One of the characters in your army must be assigned as your Warlord and each character type has a specific Supremacy ability it may use if it is your Warlord. The Pheromancer's Supremacy ability is to give +2 Resolve to ALL of your regiments, making them that much more resistant to taking casualties as a result of failed Resolve tests. But I clean forgot about this!

Kevin began the turn by attacking the Abomination with his valorous Household Knights. Even without the benefit of Impact attacks, they were able to take out half of the Abomination's wounds. I then drew my Pheromancer card and once again healed another d6 wounds on my FGD regiment, taking them back up to their original six stands! (But that sixth stand was comprised of only one out of four Drones ...) Kevin then Clashed against the FGDs to good result, removing two of stands I had just replaced.

I then drew my Abomination card and attacked the Household Knights. This time, I did even better and killed the two remaining Knights. When the regiment that a character has joined is removed, that character is also removed! The silver lining is, if that character's regiment had not yet acted, the character gets to make some parting attacks. That did not apply in this case, as the Household Knights (and the Noble Lord accompanying them) had already attacked at the top of Turn 5.

Finally, the remaining FGDs counterattacked the Men-at-arms, inflicting exactly one or two casualties.

At the top of Turn 6, I once again forgot to use the Pheromancer's Supremacy ability ... But I did win the initiative and drew my Pheromancer card, once again returning two stands to the FGD regiment. Kevin responded with his only remaining unit and the Men-at-Arms attacked to devastating result:  A regiment that loses half or more of the stands it began that turn with gains the Broken condition. This isn't that bad per se but if a Broken regiment would become Broken again it then becomes Shattered, meaning it is removed in its entirety.

Meanwhile, the Abomination laboriously turned around to line up against the Men-at-Arms' flank but even this tremendously fast monster could not get that far across the battlefield after wheeling around. To finish up, the FGDs again achieved exactly nothing against the Men-at-Arms.

I again won initiative on Turn 7 and again forgot to use the Pheromancer's Supremacy ability. But I did realize at this point that the Pheromancer's healing ability was neither limited to the regiment he joined nor by any range restriction. I therefore healed the Abomination back to full health to take on the Men-at-Arms!


And that's when I realized I had made an even bigger mistake than forgetting my Pheromancer's Supremacy ability on the previous turn. Rather than making my useless attack on the Men-at-Arms, I should have used the Rally action to get rid of the Broken condition on the FGD regiment. I simply didn't know that there was a Rally action. Oh well, that's what test drives are for, right?

Back during Turn 6, when the Men-at-Arms clashed against the remaining three stands of the FGD, they inflicted enough wounds to remove two more stands but NOT to outright wipe out the regiment. I was elated because this meant the Men-at-Arms would not be able to reform to avoid a flank attack by the Abomination. But since removing two of three stands was enough to again inflict Broken on the FGD, they became Shattered and had to be removed entirely along with the Pheromancer!

Kevin then reformed his Men-at-Arms for a brave last stand against the Abomination. Over Turns 8 and 9, the Abomination leisurely took them apart, resulting in victory for the alien Spires forces. It's not that the Men-at-Arms had no chance against the monster; but they would have needed to roll better than they did on both their Clash and Resolve tests, and the Abomination has special rules that allow him to tear through its victims armor and reduce their Resolve stat.

Preliminary Conclusions

I really enjoyed this test drive. Perhaps typical of Alessio Cavatore's designs, many meaningful decision points emerge from a fairly simple and straightforward rule set. Kevin and I did not encounter any questions that we could not answer by fairly quick reference to the rule book. The highlight was certainly the moving deployment zones. I am really excited to play around with the implications of that mechanic. I also loved the terrain rules, which were very simple to understand and created interesting tactical opportunities and challenges without overdetermining the shape of the game play.

Some thoughts about the Spires units:

Weighed up dispassionately, FGD have a bad stat line, sure, but as you can see they aren't meant to assault so much as to tarpit and with the support of a Pheromancer (even one played as badly as I did) they are pretty damn good at their job. The Men-at-Arms are no joke and the poor FGD survived three rounds of combat with them. Of course, putting that wall between them also helped.

I didn't talk very much about the Brute Drones above but they are suitably impressive and I don't blame Kevin for deciding to deploy his Household Knights against them. Paired with the Abomination, it is hard to know where one should concentrate; if allowed to operate together, they are capable of all sorts of hammer-and-anvil shenanigans.

Speaking of the Abomination, it is truly terrifying (and even has the Terrifying special rule). With a March value of 10 inches, Resolve 4, Defense 3, and 10 attacks ... well, the only saving grace is that its Clash value is merely 2 (meaning it normally only hits on 1s and 2s). This thing is only available as a Restricted choice for the two Spires characters that can legally bring it to the table.

The Pheromancer is the weakest Spires character and he's nothing to write home about in terms of his stat line. For those playing out of the core box, be aware that he is doomed if the Noble Lord manages to call him out in duel. But his Accelerated Hibernation ability pairs wonderfully with the FGDs, as you can see in this report. That ability, however, is not as wonderful in a list with lots of cards in your Command Stack, or at least that's my hypothesis.

Dungeons Deep & Caverns Old


Using Sellswords and Spellslingers, along with bits and bobs lifted from other rule sets or invented on the spot, we set about to some dungeon delving in Middle-earth.


Scott made up some custom dice to procedurally generate the rooms and their contents. We used the walls and doors offered by UrbanMatz and some furniture from HeroQuest and Mantic's Terrain Crate line. The front porch, as Tolkien might have called it, of our dungeon was a cozy goblin dining hall. Before dealing with all the goblins lounging around in there, a curious hobbit started exploring further until running into a corridor full of the Necromancer's minions - including a terrifying Morgul Stalker!


The frightened little hobbit slammed the door back shut and, with a couple of his hairfooted friends, desperately tried to hold it closed while the goblins screeched and pounded on the other side.


Meanwhile, another curious hobbit found himself face-to-face with a slavering warg! The plucky little fellow managed to stick the beast a few times but the other members of his fellowship could not save him from its snapping jaws. Poor little blighter.


Back on the other side of the dining hall, the goblins managed to smash down the door - just in time to be greeted by some grim Dwarves looking for a fight. The Morgul Stalker was unexpectedly tough but the Dwarves overcame him in round after round of furious mêlée.


Pushing on, the fellowship discovered a gruesome torture chamber. But everything was still and peaceful ... I suppose that only made sense considering we had slain six Moira Goblins, six Mordor Orcs, four Morannon Orcs, five Dead Marsh Specters, a Warg, and a Morgul Stalker in the first couple of rooms. Well, actually it was more than that as we had to recycle enemy models after a point ...


The surviving fellowship rummaged through the goblins' plunder, finding little of value. We really need better loot tables.


Charging through the only other doorway, our brave Men, Dwarves, and Hobbit beheld a terrible sight ...


A Cave Troll holding court over a horde of chattering Moria Goblins!


Strangely, this combat was a total breeze. I think we are going to need to make up original monster cards to better represent Lord of the Rings content rather than just using the ones available for Sellswords and Spellslingers via Wargame Vault.


It was getting late but we generated the next room and its occupants just to see what awaited. More Dead Marsh Specters, some Army of the Dead type guys, and a Barrow White. I wonder if it would have been as thrilling as the fight against the Morgul Stalker or a let down like the Cave Troll.


And here's an overview shot of the dungeon generated by the end of the session.


Another ASoBH Demo AAR

This past Saturday, I had the opportunity to introduce Scott to Advanced Song of Blades and Heroes. Doug was on hand with his Blightkings to preach the word of Papa Nurgle once again - this time, against Scott's Necromancer and his grouchy skeletal minions.

For our last ASoBH demo AAR click here ... especially if you don't like Elves.

the field of Mars

The Blightkings started on the hill at (A). Doug won the roll off for initiative and charged toward Scott's entrenched position at (B) with two Blightkings while the Lord of Plagues commanded the center of the field and ordered the third Blightking to flank from the south.

the live action version

Scott meanwhile moved his Skeletons into position to trap the eager Nurgle worshippers at the neck between the cliff face and rocky hill. For this game, both Scott and Doug had leaders to wrangle their Q4 minions so getting into position was not a problem for either side. Scott had to work with his Skeletons' Slow trait but was probably content to set up defensively anyhow and meet the rotten onslaught with superior, if creaky, numbers.

oh man look at those bonemen go

Battle first commenced at the bottleneck at (i) on the map above. Frustrated by his Skeletons' inability to cleave through the heavily armored Blightkings, Scott sent in his Skeletal Champion. Because of his Weapons Master trait, the Champion could make an attack with every action once engaged. Unlike in the last demo game, the Blightkings were no longer burdened with the Lumbering trait, ensuring that the Skeletons would not just walk away from them without repercussion. Only the Lord of Plagues had the Tough trait this time, however; the others had to make do with Hard Hide.

nyaaaah!

The Skeletal Champion waded in to great effect, ultimately laying low the dreaded shield-bearing Blightking. The Lord of Plagues, however, took advantage of this distraction to finally join the battle, charging in to threaten the Necromancer. I gave the Necromancer the Standard Bearer trait to help with the morale issue Undead mooks have in ASoBH: namely they crumble to dust if they fail on two or three morale tests. Plus, felling the Necromancer would immediately cause them all to take morale tests.

team work!

The Blightking on the Hill had the Double Strike trait and came down on one of the Skeletons like a ton of bricks - double 5s gave him a result of 12 overall! But Scott ended up with a 7 and then rolled a 6 for Block. As soon as he had initiative again, Scott charged the recoiled Skelly back in and rolled some more 6s, knocking the Blightking prone with one bony minion and then finishing the rotten one off with another. For the second time, Hard Hide was no use to Doug. Had he lost Nurgle's favor? Too many showers the previous week, perhaps?

nap time, I guess

The Champion arrived too late ... to help the Necromancer fell the Blightking with the Huge Weapon. The -1 to C for using that weapon "one-handed" really hurt this guy. The Lord of Plagues meantime found a Skeleton popping up wherever he took a step.

and yet he found a way!

Taking advantage of his comrade's demise, the Lord of Plague finally managed to get into combat with the Necromancer. This was Doug's big chance to pull the ripcord. All he needed to do was cut that frail wizard down ...

swarm him, my pretties

... but instead found himself recoiled by the Necromancer's single spell - Blast - giving the Necromancer enough space to move away and put some bones between them. The wind of Shyish was blowing at gale force now.

drag him down into the mud

The Lord of Plagues quickly found himself surrounded and although he managed to stand back up and fight again and again, the increasingly grouchy skeletons bit and clawed and stabbed and cut and bashed until there was nothing left but the memory of an overripe stench.

Scott rolled his way to victory with 6 after 6 after 6 while Doug struggled to overcome the numerical advantage. He did not take out a single skeleton until the final scrum at point (ii), which lasted for at least five or six turns. By that point, the Necromancer was safely perched on the hill, cackling as his soulless minions tore apart Nurgle's chosen fall guy. Oh that's a pun because he was knocked prone about five times.

We really should have taken the time to come up with a scenario to make the fight more tactical. Even so the Trait make-up of the warbands did give rise to certain tactics which both players immediately understood and took advantage - or tried to take advantage - of. The important thing is, we had yet another game with thrilling moments!